Product to Model
Create on-model visuals from product photos. With Product to Model, upload a clothing or accessory photo and generate an image of that product on a model.
What is Product to Model?
Product to Model lets you:
- Take a flat-lay, ghost mannequin, or hanger photo
- Automatically apply that garment onto a generated model image
- Generate on-model visuals suitable for ecommerce
- Preserve details, texture, color, and fit
Use it for ecommerce listings, social images, and lookbooks.
When to Use
You have a standalone, wearable product photo and you want to show the item on an AI fashion model.
- If you need to place a product onto a specific existing model photo, use Try-On.
- If your source already shows a person or mannequin and you want to change the person while keeping the product unchanged, use Model Swap.
- If you want a clean catalog packshot of the product instead of an on-model image, use Packshot.
Watch the Video
Prefer video? This walkthrough covers everything from basics to advanced controls like Image Prompts, Background References, Face Reference, and resolution modes.
How to Use It
Start transforming your products into on-model visuals with these simple steps:
Upload Your Product Images
Upload a clear image of your product. You can upload up to three product images per generation to combine multiple items in a single look (for example, a top, bottom, and accessory).
To add more products, click Add another image after uploading the first one. You can reorder or remove items before generating.

After uploading, click the Edit icon on any image to crop, rotate, or refine it before generating. See Built-in Image Editor for details.
Add Optional Guidance
Run with or without a prompt. To guide the result, you can add:
- Text Prompt to describe the person, pose, styling, background, or lighting
- Image Prompt to guide pose, environment, and lighting
- Background Reference to set the scene
- Face Reference to match identity
See Parameters for more details.

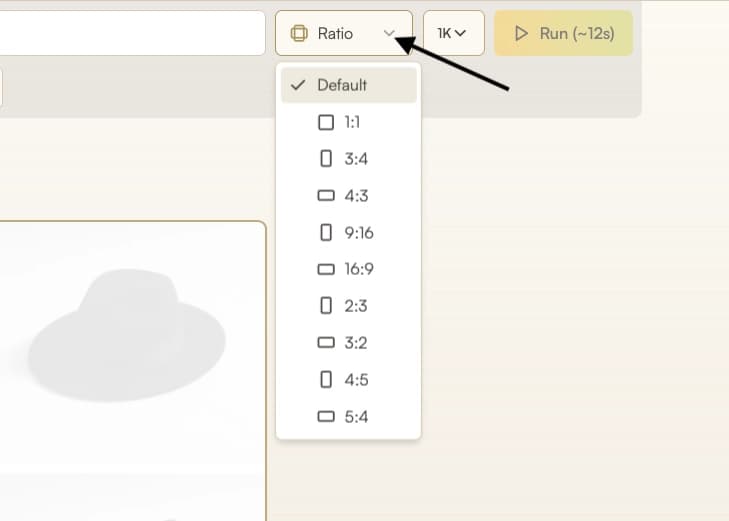
Select Ratio & Resolution
Select the ratio that fits your website layout, catalog, or social platform. Common options are 1:1 square, 2:3 or 3:4 for fashion catalogs.
For resolution, pick the level that matches your use case. Bear in mind that the resolution you pick can affect generation credit cost.
Generate the Image
Click Run to generate your image. You’ll see your garment or accessory displayed on the model.
Review and Adjust
Examine the result. You can run the generation again for a different option or tweak your text prompt to switch up the pose or other composition specifics.
Prepare for Export or Continue Editing
Prepare your result for export or continue refining the image in Edit.
- Download, upscale, or use Export for Web in Gallery
- Adjust pose or background with Edit
- Create a short video from this image with Image to Video
Parameters
Only the product image is required. Other inputs are optional and can be combined.
| Parameter | Description |
|---|---|
| Product image | Clear flat-lay, ghost mannequin, or on-hanger photo of a wearable product. Upload up to 3 product images per generation to combine multiple items in one look. |
| Number of images | Generate 1–4 outputs in one run. Results follow the same prompt and appear as a single scrollable entry in Gallery. Credit use scales with the count. |
| Text prompt | Describe model attributes, pose, background, lighting, and camera style. If you don't provide a text prompt, the system will create a fitting model and scene based on the product image. |
| Image prompt | "A picture is worth a thousand words" - use an example image to guide generation instead of or in addition to text. The system will only take inspiration and won't copy the exact details from the image. |
| Background reference | Background image used as the backdrop for generation. Ensures location consistency across campaigns. Upload your own image or pick from the Starter Backgrounds gallery. If a person appears in the background image, they will be ignored and only the background will be used. |
| Face reference | Face photo to guide identity. When provided, the system refines identity to match the reference while keeping product fidelity. Pick from the Starter Faces gallery or, on the Agency plan, upload your own. See the Face Reference guide for the full feature breakdown. |
| Aspect ratio | Choose the output ratio. If you don’t choose one, the result inherits the ratio from the reference image you supplied (Background reference or Image prompt; otherwise Product image). Supported: 1:1, 3:4, 4:3, 9:16, 16:9, 2:3, 3:2, 4:5, 5:4. |
| Resolution | Auto (default), 1K, 2K, 4K. Auto matches output to your input image resolution. See Resolution & Generation Mode. |
| Generation Mode | Auto (default), Fast, Balanced, Quality. Auto selects the optimal mode for your input. See Resolution & Generation Mode. |
Starter Backgrounds
Click the Background button in the bottom toolbar to open the Background Reference popover. The popover shows an upload area and a FASHN Backgrounds quick-pick strip. Click any thumbnail to use it as your backdrop, or click Browse all to open the full gallery.

Starter Backgrounds are available on all paid plans.
Starter Faces
Click the Face Reference button in the bottom toolbar to open the Face Reference popover. The popover shows a FASHN Faces quick-pick strip. Click any thumbnail to use it as your face reference, or click Browse all to open the full gallery.

FASHN Faces are available on all plans. Uploading your own face images or creating custom faces requires the Agency plan. See the Face Reference guide for the full feature breakdown.
Best Practices
- Use clear images where the entire garment or accessory is visible, with even lighting and minimal background clutter.
- Product photos should match or exceed the chosen resolution setting (for example, use 1K images for 1K output, 4K for 4K).
- Provide product photos taken from a clean, top-down angle (flat lay style). Avoid tilted or uneven shots, such as garments photographed on the floor from a standing angle.
- Avoid shadows, wrinkles, or cropped edges in product images.
- Match the model’s pose to the garment type. Front-facing tops work best with front-facing models, for instance.
The better your inputs, the more natural and photorealistic your results will be.
What’s Supported
- Upload up to 3 separate product images per generation. You can also include multiple products in a single image, but separate images give the best results for each item.
- Works with flat-lay, ghost mannequin, and on-hanger product photos
- Compatible with all major wearable categories, including garments and accessories such as hats, shoes, bags, belts, and eyewear
- Supports vertical, square, and widescreen output formats
Troubleshooting
If your output doesn’t look quite right:
- Difficulty in generating full-body images → Add details for footwear and hair appearance in the text prompt.
Minor adjustments often improve results dramatically.
Where Next?
After generating, the post-result suggestion bar offers quick access to related tools:
- Increase resolution with Upscale
- Add branded or lifestyle scenes with Edit
- Fit marketplace or social aspect ratios with Reframe
- Convert your new image into motion clips with Image to Video